Modify templates with path editor
Path Editor
The Path Editor is an advanced vector modification tool that allows you to manipulate the actual geometry of a template. Whether you need to adjust a specific corner, smooth out a jagged edge, or create a custom modification like wrapping edges for PPF, this tool gives you point-by-point control over the cut lines.
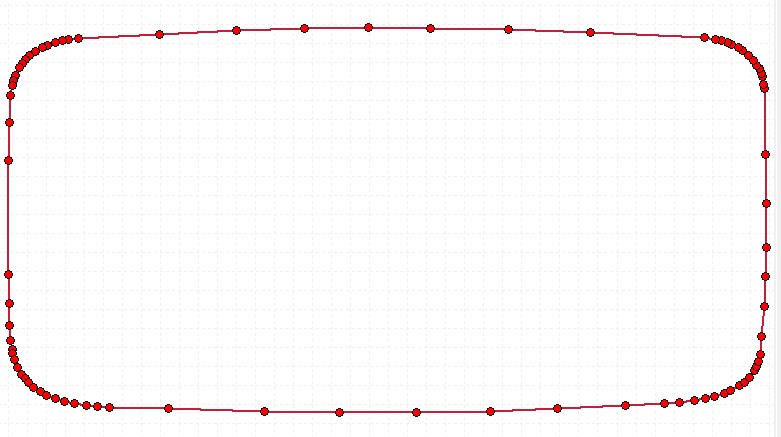
The Path Editor displays the template's vector nodes (red dots) for precise adjustments.
How to use the Path Editor
- 1. Select Template: Load the template to your canvas and click to select it.
- 2. Open Editor: Navigate to the Tools section and click the Path Editor icon. This will open a dedicated dialog window showing the template's vector paths and red nodes (control points).
-
3. Essential Tools:
Use the toolbar at the top of the dialog window to choose your action:
-
Pan (Hold Space):
Hold down the Spacebar on your keyboard and click-and-drag to move around the workspace. Scroll your mouse wheel to zoom in and out. -
Select Box:
Click and drag a box over multiple nodes to select them all at once (they will turn orange). Benefit: Allows you to move or apply effects to an entire section of the template simultaneously. -
Move Node:
Click and drag any existing red node to move it. Benefit: Perfect for manual, precise adjustments to a specific curve or corner. -
Add Node:
Click anywhere on a line segment to insert a new red node. Benefit: Allows you to create new shape variations or add details where none existed before. -
Remove Node:
Click on a red node to delete it. Benefit: Excellent for "cleaning up" a messy line. -
Make a Straight Line:
Click on a node, then click on another node. The path between them will be forced into a perfectly straight line. Benefit: Quickly removes unwanted curvature from edges that should be flat. -
Measure:
Click two points on the workspace to measure the exact distance between them. Benefit: Ensures your manual adjustments are perfectly accurate.
-
Pan (Hold Space):
-
4. Advanced PPF Tools:
These tools are specifically designed to speed up Paint Protection Film and window tint modifications:
-
Extend Edge (Wrap):
Click directly on a line segment between two nodes. A prompt will ask for a distance (in cm or inches). The software will automatically push the entire edge outward perfectly perpendicular. Benefit: Saves massive amounts of time when you need to add extra material to wrap around a hood or door edge, keeping the original curvature intact. -
Round Corners:
Click on a sharp corner node and enter a radius (e.g., 0.5 cm). The software will calculate the angle and create a perfectly smooth, rounded curve. Benefit: Sharp 90-degree corners are the most common cause of PPF peeling. This tool prevents peeling and ensures a durable installation. -
Smooth Selected Nodes:
Use the Select Box to highlight a jagged or messy area, then click this button. The software will average out the points. Benefit: Instantly turns a jagged, hand-drawn line into a smooth, factory-quality curve.
-
Extend Edge (Wrap):
- 5. Apply Changes: Once you are satisfied with your edits, click Apply at the bottom right. The template on your main canvas will immediately update to reflect your changes. If you make a mistake, you can always use the Undo or Reset to original buttons inside the editor.
Pro Tip - Simplifying Lines:
If a template edge looks jagged or has too many unnecessary points, use the Remove Node tool to delete the excess points. Alternatively, select the messy points with the Select Box and hit the Smooth button. This will make the plotter cut faster and yield a much cleaner edge on the film.
If a template edge looks jagged or has too many unnecessary points, use the Remove Node tool to delete the excess points. Alternatively, select the messy points with the Select Box and hit the Smooth button. This will make the plotter cut faster and yield a much cleaner edge on the film.
Was this article helpful?
Contact Support