Optimize workflow with Supernest
Smartnest Optimization Tool
The Smartnest feature is a powerful optimization engine powered by advanced algorithms. It analyzes your workspace and rearranges selected templates to determine the most material-efficient layout in seconds. Instead of manually puzzling pieces together to minimize waste, Smartnest does the heavy lifting with a single click.
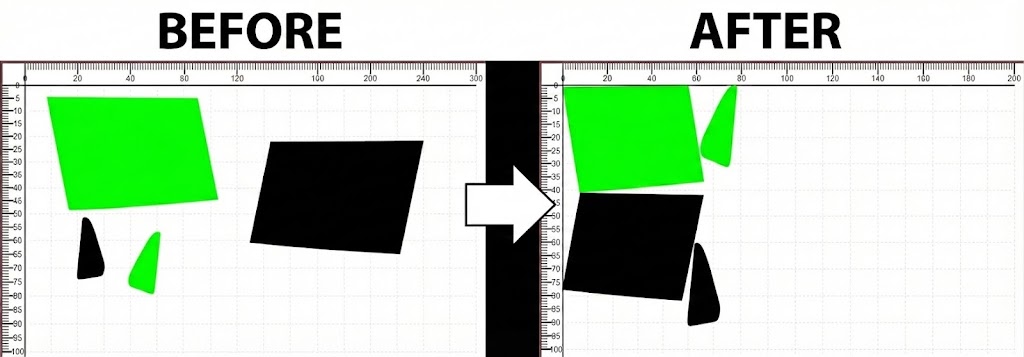
Example: Significant material savings achieved automatically with Smartnest.
How to use Smartnest
- 1. Load Templates: Import all necessary templates onto your current workspace (canvas).
- 2. Select Items: Select the templates you want to nest by clicking and dragging a rectangle around them with your mouse.
- 3. Launch Smartnest: Click the Smartnest icon located in the Tools section.
- 4. Configure & Start: Choose your rotation settings (see warning below) and click Start to begin optimization.
Critical for Window Tinting (Heat Shrinking):
Automotive window film has a specific grain direction and can usually only be heat-shrunk in one direction (typically along the length of the roll).
Automotive window film has a specific grain direction and can usually only be heat-shrunk in one direction (typically along the length of the roll).
- Curved Glass (Back Windows): You must manually orient the back window template correctly on the canvas to ensure it can be shrunk. Once oriented correctly, uncheck "Allow Rotation" in the Smartnest settings. If allowed to rotate, the software might position the window sideways to save space, making it impossible to shrink on the glass.
- Flat Glass: For side windows or flat glass where heat shrinking is not required, you may check "Allow Rotation" to achieve maximum material savings.
Pro Tip - Mass Rotation: Need to fix the orientation before nesting? Select all templates by dragging a box around them, then click the Rotate Icon in the Tools panel to rotate the entire selection 90 degrees at once.
Canvas Configuration
Material Settings
For Smartnest to calculate the layout correctly, the software must know the exact dimensions of the material loaded in your plotter.
- Film Width: Ensure the Film Width setting in Platinum Cut matches your physical roll exactly (e.g., if you have a 101 cm roll, set the width to 101 cm).
- Film Length: Ensure the length is set correctly to avoid the software placing templates outside the cutting area.
Was this article helpful?
Contact Support